Viewing Halley’s Comet Can Be a Snap
- Share via
Ben Mayer is not shy about expressing his opinion that the scientific community and the media are mishandling the current wave of enthusiasm over Halley’s comet. He charges the former with “alienating the Joe Blows” by using a slew of technical terms in describing the comet instead of simple directions on how to find it.
He is annoyed with the latter for playing up glittery comet hype--parties, souvenirs, cruises and the like--while unfavorably comparing the comet’s current passage with the one in 1910.
Instead, the Bel-Air resident, amateur astronomer and author of “Halley’s Comet Finder” works up considerable enthusiasm explaining how, with a little effort, a 35-millimeter, single-lens reflex camera and a few simple tools, just about anyone can not only spot Halley’s comet but photograph it as well.
The first half of January, he says, offers an inviting “window” for comet viewing. Moonlight will not be a factor, and the comet will be in the early-evening sky, making a comet-watching trip practical for youngsters. Halley’s comet will appear in the constellation Aquarius.
“If you have a 35-millimeter camera, you have an observatory,” Mayer says. Cameras with standard 50-millimeter lenses are better-suited for finding the comet than telephoto lenses, he says, because the standard lenses are generally more effective light collectors. Because camera shutters can be held open for extended periods of time and because extremely “fast,” or light-sensitive, films have been introduced in the last several years, cameras can photograph objects that cannot be seen with the naked eye, he says.
To photograph the comet, Mayer says you should have the following:
1) 35-millimeter camera.
2) Tripod or camera clamp and stepladder.
3) Fast color slide film (at least 400 ASA).
4) Shutter cable release.
5) Pad and pencil.
6) Wire coat hanger.
7) Dark, clear sky.
8) Unobstructed southwestern horizon.
The city is not the best place to view a faint celestial object, such as a comet. The glare from city lights makes the sky bright. That is why you can see so many more stars far out in the country.
Find someplace dark where the southwestern horizon is not obscured by mountains, trees or buildings. And remember: The best viewing is on a clear, cloudless night.
During the first part of January, Aquarius will be just above the horizon for about three hours after sundown. Mayer suggests marking the spot where the sun sets with two sticks placed in a line pointing toward it or by picking out a landmark near the sunset. This mapping should be done just after the sun has disappeared beneath the horizon. There will still be enough of the sun’s afterglow to mark the spot, and you will avoid the harmful effects of looking into the sun.
To figure out where to point the camera, Mayer suggests using what he calls a “Starframe,” which is nothing more than a wire coat hanger bent into a square. Holding the wire square about 18 inches away from your eyes, you will be able to frame about the same piece of the heavens that you can see through the camera.
Use the Starframe to map out a diamond-shaped portion of the sky, with the bottom of the diamond just above the point on the horizon where the sun set. By the time the sky becomes completely dark, 90 minutes after sundown, the entire constellation of Aquarius--which looks likea kite with a long tail--should be
visible in the Starframe.
While waiting for the sky to grow dark, adjust your camera so that it points toward the diamond-shaped patch of sky.
Use a tripod or a camera clamp attached to a stepladder to position the camera. You will also need a cable release, an inexpensive device that allows you to hold the camera shutter open for extended periods of time without actually having to put your finger on the shutter button, which would jiggle the camera enough to spoil a long-exposure photo.
By the time the sky is dark, you should have the camera pointed at Aquarius and your cable release ready to go. The shutter speed should be set on B (or bulb), the aperture of the lens should be wide open (set to the smallest number on the lens), and the focus should be on infinity.
The pictures you take of the comet are going to depend on experimentation and taking notes. Mayer suggests holding the shutter open on the first photo for 16 seconds. Then, on successive photos hold it open 18, 20, 22, 24, 26, 28 and 30 seconds. Then, shoot the rest of the roll going in two-second increments from 30 to 16 seconds.
Exposures of less than 16 seconds are not likely to gather enough light to provide good pictures of the comet, Mayer says. Exposures longer than 30 seconds begin to run into problems with trails. That means that the rotation of the earth is great enough during that period of time that objects in the sky appear to move, and therefore blur, on the film. (Astronomical telescopes have motorized tracking devices that compensate for this motion, and cameras may be piggybacked on them, but such sophisticated equipment is expensive.)
Continue to use the Starframe to track the movement of Aquarius and adjust the camera accordingly. Aquarius will set about three hours after the sun in January, so the comet will be visible only in the early evening.
It is quite likely that the first night’s photo session will bring about a couple of good photos of the comet, Mayer says. It is important to take notes of exposure times so you will know what worked best for you. If you have trouble collecting enough light without creating trails, ask your film processing lab to “push” the film when developing it.
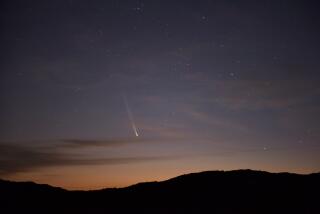
If you have succeeded in photographing the comet, it will appear as a blue object against a backdrop of white or yellow stars.
If you have done a good job of collecting comet light, you should be able to see a tail pointing to where the sun set.
This is part of a continuing series of free-lance columns that help explain how to deal with situations in our lives and/or how to make life more enjoyable.
More to Read
Sign up for Essential California
The most important California stories and recommendations in your inbox every morning.
You may occasionally receive promotional content from the Los Angeles Times.


