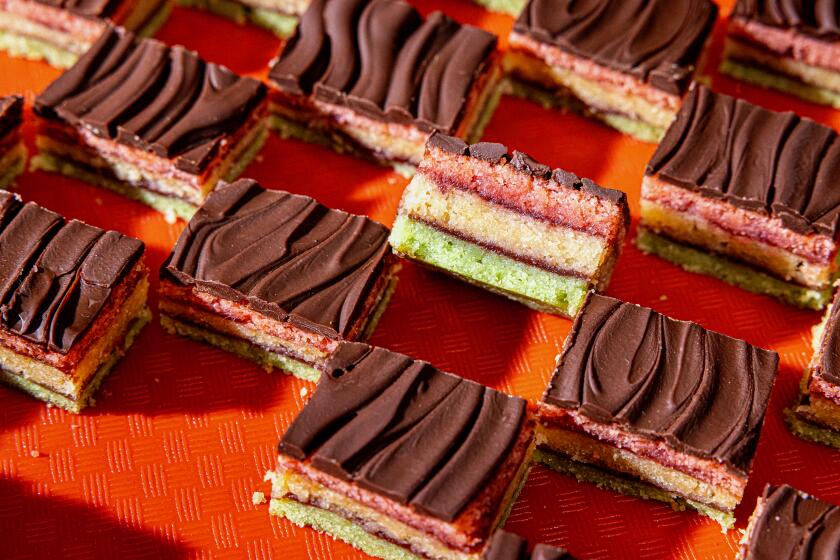
Chocolate Rigo squares
- Share via
No matter how wonderful the array of savory dishes on the buffet, at an open house some folks can’t help but stop by the dessert table first. Who can blame them? For sweets lovers, a lavish display -- and the possibilities of multiple choices -- is an irresistible temptation.
But even for those goody two-shoes who eat their way through the feast in the “proper” order, the appeal of indulging in not one, but several different desserts is the fun at the heart of a dessert bar.
The offerings should be right for making up a sweet cocktail-party plate, one holding a medley of tastes and tidbits: a tiny piece of fruit tart, a nibble-sized chocolaty petit four, a few spiced nuts. Nothing that requires a fork or a bib, please. Nothing that stupefies your guests with sugar.
Although the fully laden dessert bar that allows partygoers to pick and choose their treats looks as if it took days of stove-hovering to devise, it’s really not that hard.
It’s all in the planning.
First, select two or three key desserts to feature: cakes, tarts or bar-type concoctions that are baked in a single pan and then cut into pieces. One should be chocolate, one fruit-based (citrus is the classic contrast) and a third might be light or nutty or meringuey or whatever appeals. This is not the place for iced cookies in the shape of dreidels, fussy hand-decorated mini cakes or crumbly two-crusted fruit pies.
So in addition to having wonderful flavors, the desserts should be eminently sliceable, lend themselves to small portions, and be lovely to look at not only when they’re first placed on the table, but when seen at the party’s midpoint.
Set up your dessert bar in a different room or part of the room than your main buffet; making it part of a coffee service area is nice. Bring out your pedestal cake plates and tiered serving dishes. Both are wonderful here because displaying desserts at several levels makes the table seem less crowded and spotlights your creations. Slice some of the desserts before setting them out, but make pieces half the size of a normal serving (this goes for brownies and bars too).
Baking for your dessert bar should be done the day before your open house, so select your recipes accordingly. It’s fine to go with old favorites, but there’s no reason not to try new recipes.
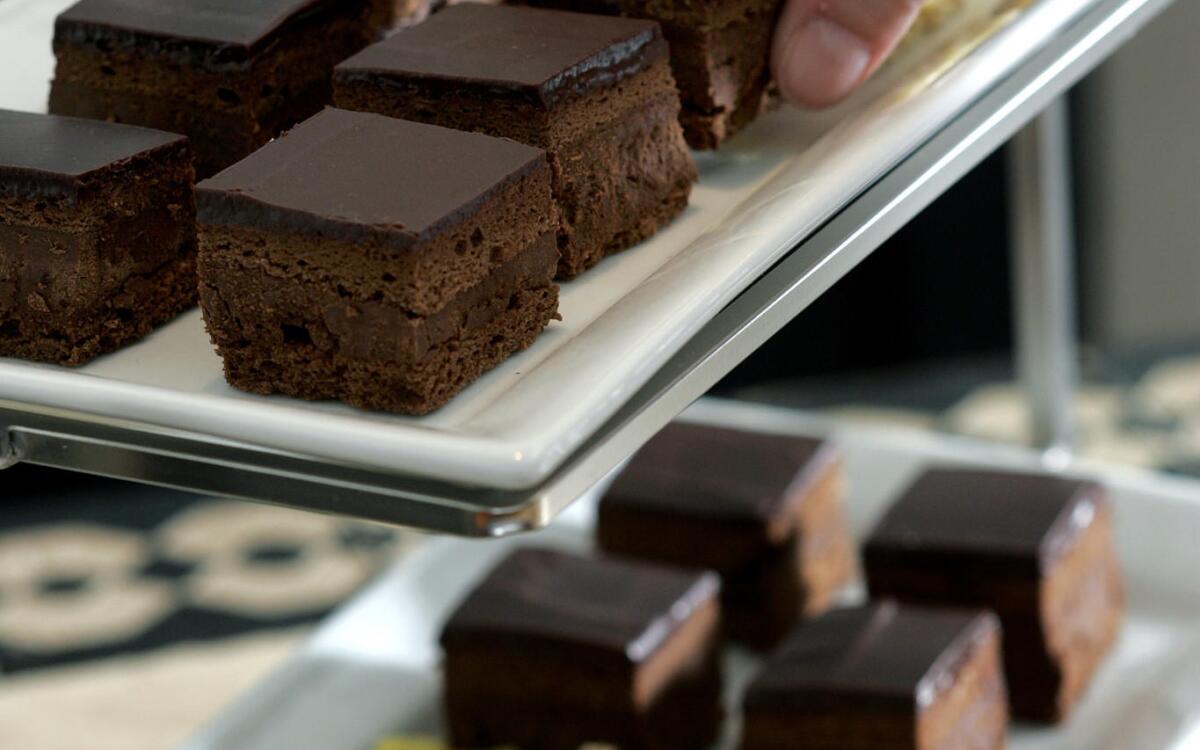
We selected one from cookbook author-baker Nick Malgieri’s book “A Baker’s Tour” for Rigo Jansci cake, a kind of chocolate petit four from Hungary. A rectangular chocolate cake is sliced into two layers, filled with a chocolate cream, glazed and then chilled. Sliced into smaller-than-usual squares, it’s a densely chocolate mouthful -- and no more.
For a cool, citrusy note, try a lime curd tart. Mexican limes are in season now and are great to use if you have a source, or use regular limes. Make your favorite tart-shell recipe (a sweet-almond pastry is nice) and bake it in a rectangular tart pan. Fill it with a batch of lime curd made by whisking three eggs and three egg yolks in a saucepan with three-fourths cup sugar, a generous half a cup of lime juice and some lime zest, then cut up 10 tablespoons of chilled butter.
Cook over medium heat, stirring and scraping the bottom with a rubber spatula until the mixture thickens, but do not boil. Cool the curd with a piece of plastic wrap pressed onto the surface so it doesn’t form a crust. Finally, spoon the curd into the shell.
Using a rectangular tart pan (available at cooking supply stores) allows guests to easily help themselves to bite-size servings, something that’s impossible to choreograph with a round tart.
Tall and impressive, the more so on a footed cake plate, an angel food cake is an unexpected but welcome note on the dessert buffet. Our espresso-flavored version, glazed with an espresso ganache and decorated with chocolate-covered espresso beans, is beautiful enough for a place on the pedestal.
Try to get your hands on Trablit, a coffee extract available at cooking supply stores, but you’ll also get good results using instant espresso powder.
With your star offerings in place on the dessert table, plan a few homemade or purchased supporting players: tiny, visually appealing tidbits to offer in small bowls. I like to make spiced nuts, candied grapefruit peel and nut brittle or toffee. For the nuts, toss two cups of pecan halves or blanched almonds with one tablespoon lightly beaten egg white, one tablespoon cinnamon, one-fourth teaspoon nutmeg and one-half teaspoon sea salt. Bake on an ungreased baking sheet at 300 degrees for about 35 minutes, until crisp.
Or, you might offer a selection of glace fruits, the “sugar plums” of our time, so beautiful they look like Christmas ornaments. And fill a bowl with citrus for eating out of hand -- tempting Satsuma tangerines or Clementines, perhaps.
For Southern Californians, the waves of fresh grapefruits, mandarins and oranges arriving in markets are as much a part of the holidays as Santa in sunglasses and patio parties in mid-winter.
And like the dessert bar, they’re a symbol of sweet hope for the future.
Chocolate cake
Set a rack in the middle level of the oven and heat the oven to 350 degrees. Bring a small pan of water to a boil and turn off the heat. Combine the chocolate and one-fourth cup water in a heatproof bowl and place it over the pot of water. Stir until the chocolate is melted and smooth. Keep warm.
For the cake batter, put the 6 egg yolks in the bowl of an electric mixer and whisk in one-fourth cup of the sugar by hand. Place the bowl on the mixer fitted with the whisk attachment and whip the mixture on medium-high speed until the yolks and sugar are light and thickened, about 2 minutes. If you only have one mixing bowl and one whisk, scrape the yolk mixture into another bowl. Wash the whisk and bowl in soapy water, then rinse and dry them.
Put the 6 egg whites and salt in a clean, dry mixer bowl. Place on the mixer fitted with the whisk attachment, and whip the whites on medium speed until they are white, opaque and beginning to hold a very soft peak. Increase the speed to medium high and whip in the remaining one-fourth cup sugar in a stream. Continue whipping the whites until they hold a firm peak.
Stir the melted chocolate into the yolk mixture, immediately followed by one-fourth of the whipped egg whites. Sift and fold in the flour, and then fold in the remaining egg whites.
Scrape the batter into a 12-by-18-inch jellyroll pan, bottom and sides buttered and lined with buttered parchment or foil. Use a spatula to spread the batter evenly.
Bake the cake layer until it is risen (it will not rise very high) and firm when pressed with a fingertip, about 15 or 20 minutes. Use a spatula under the parchment to help lift the cake from the pan onto a wire rack to cool.
Chocolate filling
For the filling, bring the cream and corn syrup to a boil in a large saucepan, stirring occasionally to make sure that the corn syrup doesn’t fall to the bottom and burn. Remove the pan from the heat and add the butter and chocolate. Gently shake the pan to make sure that the butter and chocolate are submerged, then wait 2 minutes for them to melt. Whisk the filling smooth and pour it into a bowl. Refrigerate the filling until it is about 80 degrees, or until it is of spreading consistency, about 45 minutes. Don’t leave the filling in the refrigerator too long or it will become too hard to whip.
To assemble the cake, slide the paper with the cake still stuck to it onto a cutting board. Cut through both the paper and the cake with a sharp, serrated knife to make two 12-by-9-inch rectangles. Slide one off the cutting board.
Scrape the cooled filling into the bowl of an electric mixer and beat it with the paddle on medium speed until it is lightened to a milk chocolate color. Don’t over-beat or the filling will separate.
Immediately use an offset spatula to spread the whipped filling evenly over the cake layer on the cutting board.
Invert the remaining cake layer, still stuck to the paper for easy handling, to a cookie sheet with no sides or to a stiff rectangular piece of cardboard. Gently slide the cake layer into place over the filling. Carefully peel off the paper.
Place a stiff cardboard or cookie sheet on the cake and gently press to make sure the top layer of cake adheres well to the filling. Refrigerate the cake while preparing the glaze.
Glaze and assembly
For the glaze, bring the cream and corn syrup to a simmer in a medium saucepan, stirring occasionally. Remove the pan from the heat and add the chocolate. Gently shake the pan, to make sure that all the chocolate is submerged, then wait 2 minutes for it to melt. Whisk the glaze just until smooth. Avoid whisking too much or the glaze will be riddled with bubbles. Let the glaze cool until it is just slightly warm to the touch, about 100 to 105 degrees.
After the glaze has cooled, remove the cake from the refrigerator and pour the glaze over it. Quickly spread the glaze evenly with a medium offset spatula. Don’t worry about any glaze that drips down the sides of the cake; it will be trimmed away later.
Refrigerate the cake again for at least 1 hour, or up to 24 hours, to set the glaze.
Rinse a long, sharp, serrated knife in hot water, then wipe it dry with a cloth. Use the knife to trim the sides of the cake evenly, rinsing and wiping after each cut. Cut the cake into 1 1/2 -inch squares. Keep the cake refrigerated, but bring to room temperature for an hour or so before serving. Cover leftovers with plastic wrap and refrigerate. Bring to room temperature again before serving.
Get our Cooking newsletter
Get a taste of Los Angeles — and the world — with recipes and kitchen tricks from the L.A. Times’ Cooking newsletter.
You may occasionally receive promotional content from the Los Angeles Times.


