Spiced and Juicy Roast Turkey with Easy, Breezy Gravy
- Share via
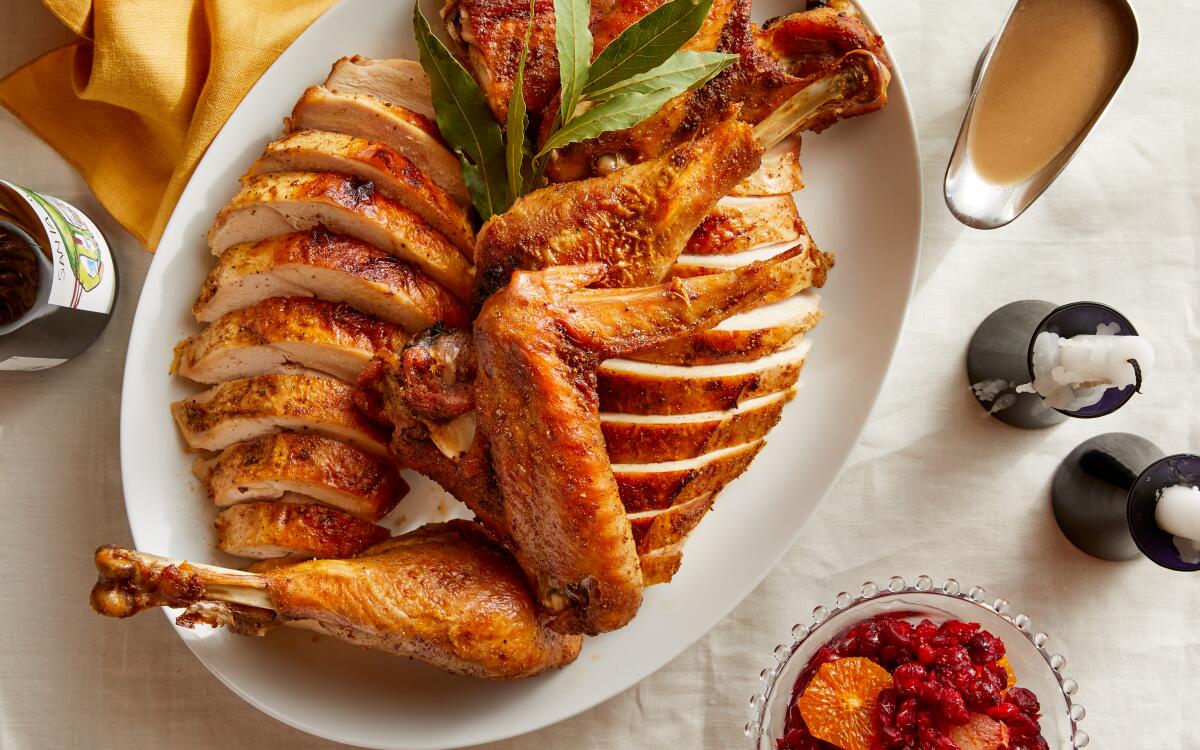
Roasting parts of a turkey makes the cooking of the bird go quicker, makes the parts easier to manage (and fit in your fridge) and makes carving time a breeze. Andy’s turkey is rubbed with a shawarma-inspired mix of black pepper, cumin, coriander and smoked paprika, which gives the turkey’s skin a burnished crispness. You’re going to butcher a whole turkey for this recipe, but if you don’t feel up to the task, ask your butcher to do it for you or buy the individual pieces, which can be found in some grocery stores. Save the backbone and neck for making the easy gravy, below, or for making turkey stock. For the spice rub, do not use pre-ground black pepper; pulse whole peppercorns in a spice grinder, or use a mortar and pestle, until they’re roughly ground.
One to two days before cooking, break down the turkey into parts: Working on a large cutting board or work surface, place turkey breast-side-up and pat dry thoroughly with paper towels. Pull a wing outward so you can see where it attaches to the body to help you find the place where the joint meets the socket. Use a sharp boning knife or chef’s knife to cut through the joint to separate the wing from the breast. Repeat on the other wing, then set both wings aside on a large rimmed baking sheet.
Next, remove the legs: Holding one leg — the drumstick and thigh combined — in your hand, use the other hand to cut through the skin connecting the leg to the breast, slowly pulling the leg back as you go to see where it clearly separates from the rest of the carcass. Pull the leg back like you’re opening a book until the ball joint, which connects the thigh to the back of the turkey, pops out of its socket (you’ll hear it). Cut through the joint to separate the leg fully. Repeat on the other leg, and transfer both to the baking sheet.
Finally, separate the breast from the backbone: Flip the turkey so it is breast-side-down. Using kitchen shears, cut along one side of the backbone until you get all the way through to the neck end, then turn the turkey around and cut through the other side to remove the backbone; transfer the breast crown to the baking sheet with the wings and legs. Reserve the backbone for making the gravy, below, or stock; store it in a zip-top plastic bag or other airtight container in the refrigerator or freezer until ready to use.
Make the spice mix: In a small bowl, add the salt, brown sugar, pepper, coriander, smoked paprika and cumin. Use your fingers to mix it together, breaking up any clumps of brown sugar, until evenly combined.
Flip all the turkey pieces so they’re skin-side-down, then sprinkle half the spice mix (about 7 tablespoons) all over them. Make sure the spices are well distributed and cover the pieces evenly; you want every piece to be properly seasoned. Flip the pieces so they’re skin-side-up, and repeat with the rest of the spice mix, ensuring an even layer of seasoning. Transfer the baking sheet to the refrigerator and let the turkey pieces chill, uncovered, for at least 24 hours and up to 2 days.
On the day of cooking: Remove the baking sheet from the refrigerator. Place a sheet of foil on a work surface, then transfer the turkey pieces to it. Clean and dry the baking sheet, then line with foil. Return the turkey pieces to the baking sheet, placing the breast crown in the center and the other parts around it, spaced evenly apart from each other. Let stand for 1 hour to allow the turkey to come to room temperature.
Meanwhile, make the herb oil: Remove 4 cloves of garlic from one of the heads, and smash the cloves; remove the peels. Place the smashed garlic in a small saucepan, add the olive oil and herbs, and place over medium heat. Once the garlic and herbs start sizzling, continue cooking, stirring occasionally, until the garlic begins to turn light golden in spots and the oil is fragrant, 2 to 3 minutes. Remove the pan from the heat and let oil cool until ready to use.
Place a rack in the middle of the oven and heat to 425 degrees. Take the remaining head of garlic and the second head and cut each crosswise across their equators. Cut each small onion into quarters; if using large onions, cut each into 8 wedges. Tuck the garlic halves and onion wedges around the turkey on the baking sheet.
When ready to roast the turkey, spoon out and discard the herbs and garlic from the oil. Drizzle or brush the herb-and-garlic oil all over the turkey, onions and garlic, ensuring everything is nicely coated.
Place the baking sheet in the oven, and roast the turkey until its skin begins to turn golden brown, about 25 minutes. Reduce the oven temperature to 325 degrees, and continue roasting until the turkey is deeply golden brown all over and an instant-read thermometer inserted into the thickest part of the breast registers 160 degrees, 50 to 70 minutes longer, depending on the weight and size of the turkey parts. The total cooking time will be between 1 and 1 1/2 hours.
Transfer the baking sheet to a cooling rack, tent loosely with foil and let rest for 20 to 30 minutes. Remove the foil, then transfer the turkey parts to a cutting board to separate and carve. Serve the turkey on a platter with the roasted onion wedges and garlic halves arranged around the pieces. Drizzle any pan juices over the meat and aromatics before serving.
Easy, Breezy Gravy
Heat the olive oil in a large saucepan over medium-high heat. Chop the turkey neck and backbone into 2 to 3 large pieces, then add to the pot and cook, flipping occasionally, until the pieces are deeply golden brown in most spots, 10 to 12 minutes. Add the mushrooms, celery, onion, garlic and thyme and cook, stirring occasionally, until the vegetables have taken on a bit of color, 3 to 5 minutes more.
Pour in the broth and bring to a boil. Reduce the heat to medium to maintain a steady but vigorous simmer and cook, stirring occasionally, until reduced by a third, about 30 minutes. Remove the pot from heat and let cool for 10 minutes.
Meanwhile, place a fine sieve over a large bowl. Using a spider or tongs, remove and discard the turkey backbone and large vegetable pieces. Pour the stock through the sieve into the bowl and discard any solids in the sieve. You should have 6 cups of stock; if you over-reduced it, simply add water to the stock to make 6 cups.
Using a fat separator or a spoon, remove 3 tablespoons of fat from the top of the stock and reserve it in a bowl; discard the rest of the fat or save for another use. If you don’t have enough fat for 3 tablespoons, add enough butter to make 3 tablespoons. (Alternatively, let the stock cool to room temperature, then refrigerate it until the fat has risen to the top and congealed, at least 2 hours or overnight.)
Place the turkey fat and/or butter in a medium saucepan and melt over medium heat. Once the fat begins bubbling, sprinkle in the flour and cook, whisking constantly, until the roux is a shade darker and looks smooth and shiny, 3 to 4 minutes. While continuing to whisk, gradually ladle or slowly pour the warm broth into the roux until it is all added. Bring to a boil, then reduce the heat to medium-high and cook, whisking occasionally, until the gravy is reduced by half (3 cups), 20 to 25 minutes. It should be thick enough to coat a spoon.
Remove the pan from the heat, stir in the Worcestershire and season the gravy with salt and pepper. Serve while hot or let cool to room temperature before refrigerating for up to 3 days. Rewarm over medium-low heat before serving. Makes 3 cups.
Get our Cooking newsletter
Get a taste of Los Angeles — and the world — with recipes and kitchen tricks from the L.A. Times’ Cooking newsletter.
You may occasionally receive promotional content from the Los Angeles Times.


